From Lab to Cloud - Installing Windows Server on a Virtual Machine: The Good, The Bad & The Ugly
From Lab to Cloud the Journey begins..
Sections
Section 3.1 IntroductionSection 3.2 Hyper-V Setup
Section 3.2.1 Oracle Virtual Box Setup
Section 3.3 Windows Server Installation
Section 3.4 Video Tutorial
Section 3.1 -Introduction
The last blog was a bit of a long one. Now we begin the third blog already, how time flies already. I bring good news and bad news at this stage depending on how you perceive it. The good news is that we can do some actual server setup and do some firsthand technical work, but the bad news is that it will get tougher from here.
But as long as you follow my advice, the journey will be easier than Liverpool beating United at Anfield for the last 3-4 years.
But first you will need to install something important needed for this phase. It is an ISO file for Windows server which you can download from the button below (evaluation means it will be valid for 180 days which should be more than enough time)
Enough rambling from me, lets begin.
Section 3.2 Hyper-V setup (W10/11 Pro only)
Hyper-V a genius invention from Microsoft. Can handle many virtual machines and is something that I have relied on in recent years. Setting this up can be a chore as there are certain steps we need to follow but setting this up is a piece of cake. (Don't worry I will try my best not to turn it into a how to blog)
1) Enabling Hyper-V
- In the bottom left (should say "Type here to search" bar and type in add features and there will be an option to "Turn Windows Features on or off". Open this and this should open up the menu below
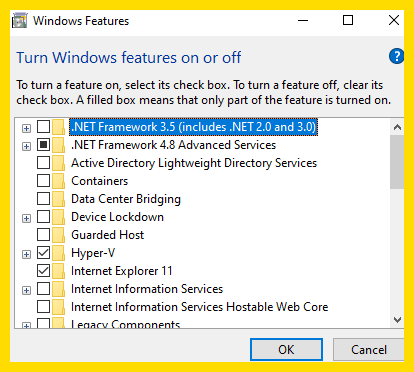
- Press Hyper-V and then Press Ok. A Window should pop up (I am sure it is not a virus. If a black box pops up, then I am not involved). It should prompt you to restart your PC. Restart it and then press the search bar as mentioned in step 1 and search for Hyper-V manager. Open this and the box below should show up
2) Creating a Virtual Switch
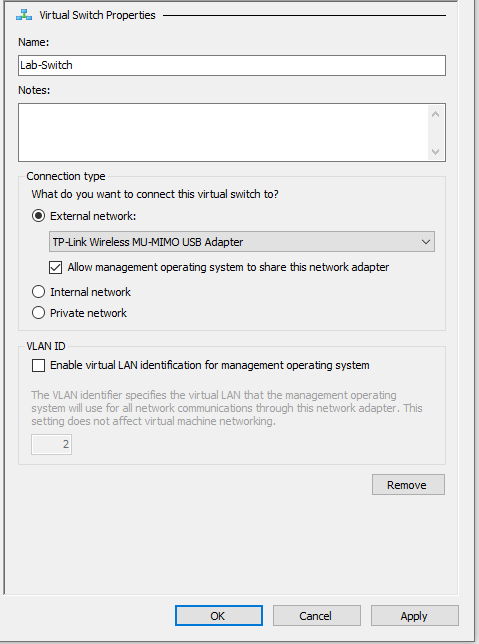
- Right click on your PC name. My PC is Desktop-G7 (pretty unique right) and then press Virtual switch manager. You will be greeted with many options but this is the easiest part.
- Press the external option and then press next and make sure to name your switch something generic like Lab switch or whatever you desire. Choose the right WIFI card (yours will be Intel Wi-Fi AX or if you are using ethernet it will be Intel Ethernet connection) and leave the checkbox ticked. Then press next which should create the switch for you and will let your VM connect to the machine.
3) Creating the Virtual Machine
If you have made it this far, we are on the right track but this step is a key step to creating the machine. Right click your PC name and press New -> Virtual Machine
3.1 Name
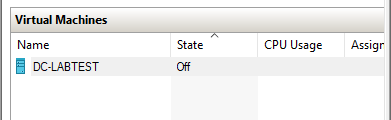
VM Name: DC-Labtest
"DC" stands for Domain Controller, and "Labtest" will be your domain name.
Alternative suggestions:DC-Intune,DC-RonaldoIsTheGOAT(your choice!).
3.2 Store the Virtual Hard Disk in Another Location
- ✅ Check this if you have another SSD or HDD you want to use (recommended for better performance or storage management).
3.3 Generation
Select Generation 2
Required for newer Windows Server ISOs and supports UEFI/Secure Boot.
3.4 Memory
❌ Uncheck Dynamic Memory
Dynamic memory can cause instability or performance issues in DC roles — especially with AD/DNS.
Set to 4000–6000 MB (4–6 GB)
4 GB is sufficient for basic lab purposes.
3.5 Network Connection
- Choose your Lab Switch from the dropdown that shows up
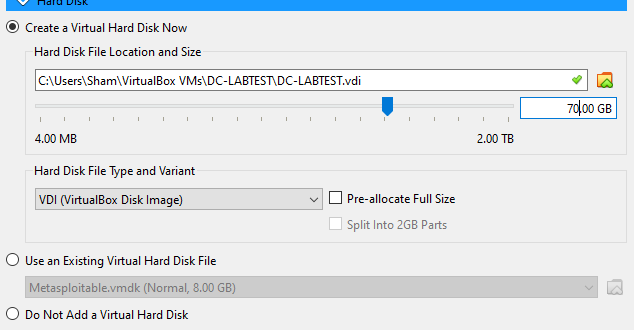
3.6) Hard Disk
- Select Create a New Virtual Hard Disk
- If you selected a different location in step 2, make sure to point the hard disk there for better I/O performance.
Set the size to 60–120 GB
80 GB is a good middle ground for most labs. Use 100+ GB if you're installing more roles or storing logs.
3.7. Installation Options
- Select Install an Operating System from a bootable image file (ISO)
- Click Browse and choose the Windows Server ISO you downloaded earlier.
- Press next and then the summary should pop up. Press Finish and you should see your virtual machine show in the list below
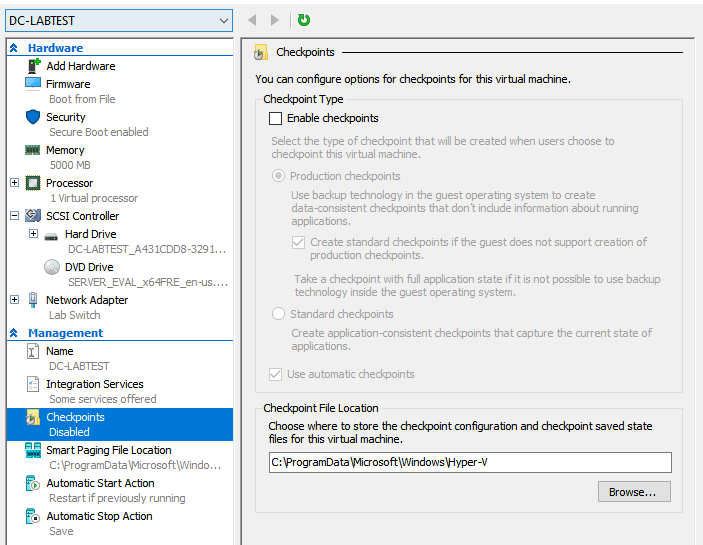
4) Disable Checkpoints
- Make sure to Disable Checkpoints as they can use up your space unnecessarily. Right click the VM and then press settings. Find the option called Checkpoints and uncheck the box. (If it says merge in progress on your VM, make sure to right click and press cancel merge)
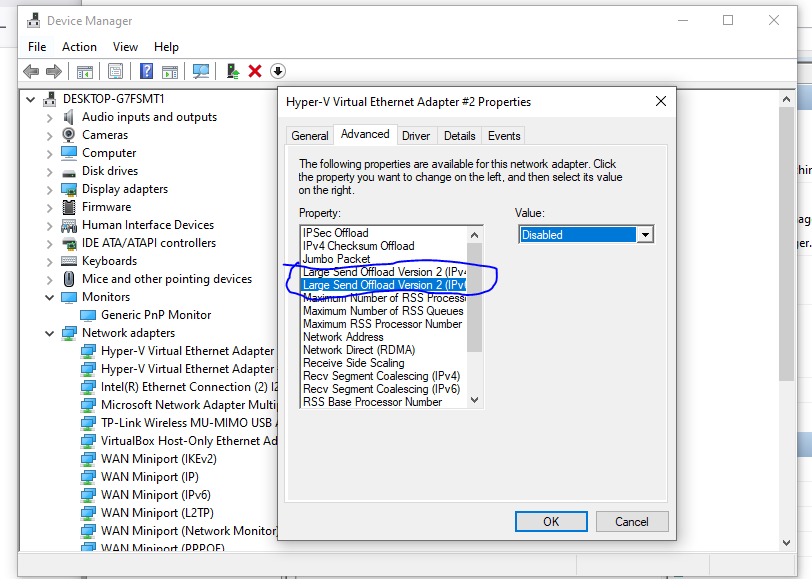
5) Disabling Large send Offload
- This is the final part I promise. Go to device manager -> Network adapters. Right click Hyper-V virtual Ethernet Adapter #2 (or you will have no hash) and then press properties.
- Press Advanced and then there should be two options called "Large send Offload". Disable them both and press ok. This prevents performance issues when accessing the VM and having it enabled will cause more issues down the line. Congratulations, We are finally done. I know it was me rambling half the time but now lets go to section 3.3
Section 3.2.1 Oracle Virtual Box Setup
Well I'm sure you read all that Hyper-V setup and lost hope when you realised it is only for people with Windows 10/11 pro versions. But do not worry, I have added a section for people that can use Oracle Virtual Box
1) Creating the VM
- Press the New icon that looks like a fictional blob character and you will be greeted with a bunch of options and I will break them down below
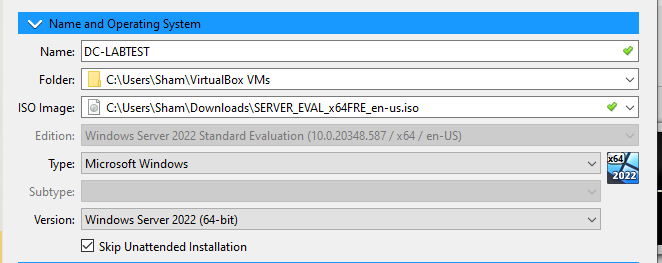
1.1) - Name and Operating System
- Name would be something like DC-Labtest or you could make your own. DC is short for domain controller and would help later
- Folder would be where you will store the VM. You can move this to another location such as an external SSD or Hard drive by pressing the folder icon
- This is a Key bit which is telling the Virtual machine what ISO it will use. Make sure to download the link I sent earlier in this blog and navigate to where that file is stored (for example could be your downloads folder)
- Make sure to check skip unattended install as I will teach you how to set this up in Section 3.3. I will attach a screenshot below
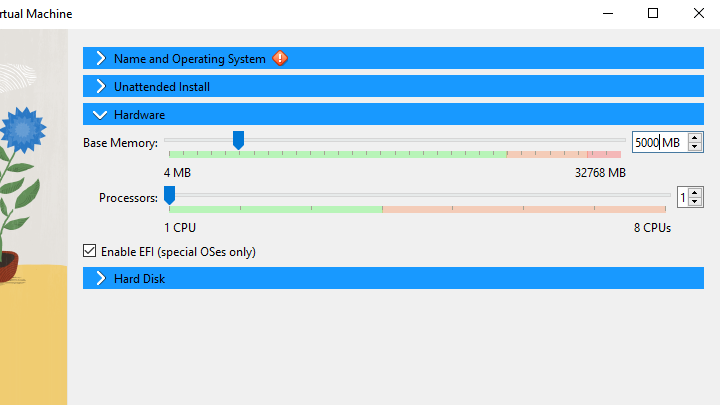
1.2) Hardware
- This section will focus on how many RAM and how many CPU processors the VM will use.
- I would reccomend 5-6 GB for this since Oracle VirtualBox can slow down with 4GB RAM
- For virtual processors choose 1 or 2. I would recommend 1 for now but you can switch it to 2 if you are having performance issues
- Leave the Enable EFI box unchecked
1.3) Hard disk
- This will be your Hard disk space the VM will have
- The recommended space is 60-80GB. This honestly depends if your PC is a beast or is an average Joe.
- You can also change where the Virtual hard drive will be saved. You can move this to another SSD or Hard drive if needed. Once done, Press finish when done. Your VM should show up in the Virtual box home page now 🎉
2) Network settings
- This part should be easy as long as you follow my words of wisdom
- Right click your VM and click settings.
- Navigate to the network area and make sure to set the Settings as below
Attached to: Bridged Adapter
Name: Your wifi name (Intel AX wifi adapter) or ethernet adapter (Intel Ethernet)
Adapter type: Leave it as Intel PRO
Promiscious Mode: Deny - Once followed, Press OK and your VM should be good to go. Easy peasey right. Now to Section 3.3
Section 3.3 Windows Server Installation
The easiest part arrives. Lets install the Server..
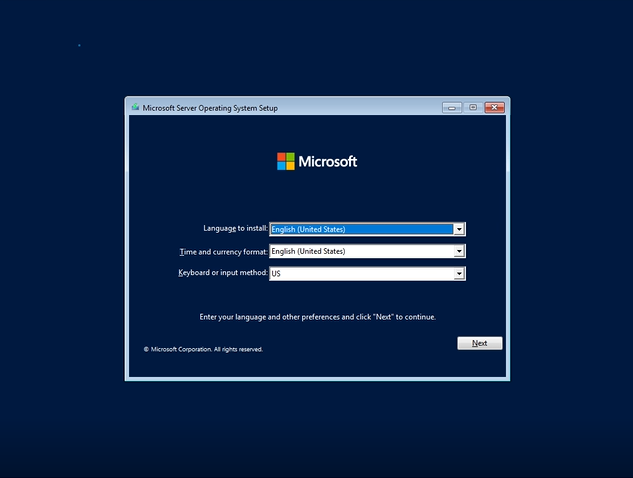
1) Launch the VM and Make sure it boots into Windows Server
- First step would be to cry. I'm joking but first step is to open up the VM by clicking it on (for Hyper-V press right click and press connect). Press any key and then this should boot into the installer and present the window below
2) Installing Windows Server
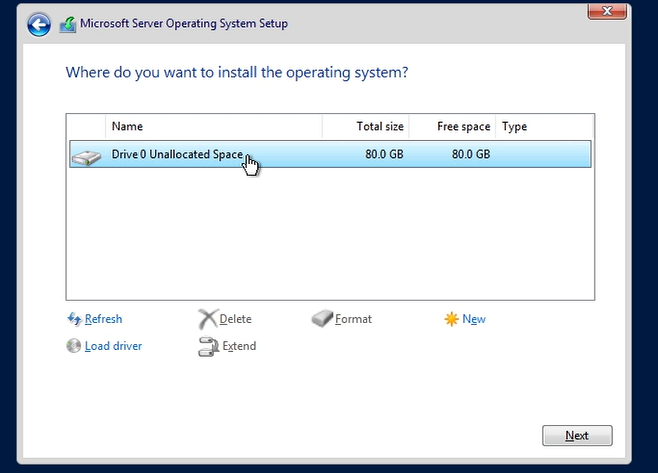
- Press next and there will be different options. Make sure to press the option to install Windows Server Standard Edition (Desktop Experience) and press next. Press Custom and press next. A drive should show up and if you have set it up properly, it should have around 60-120GB space (Mines is 80).
3) Finalisation
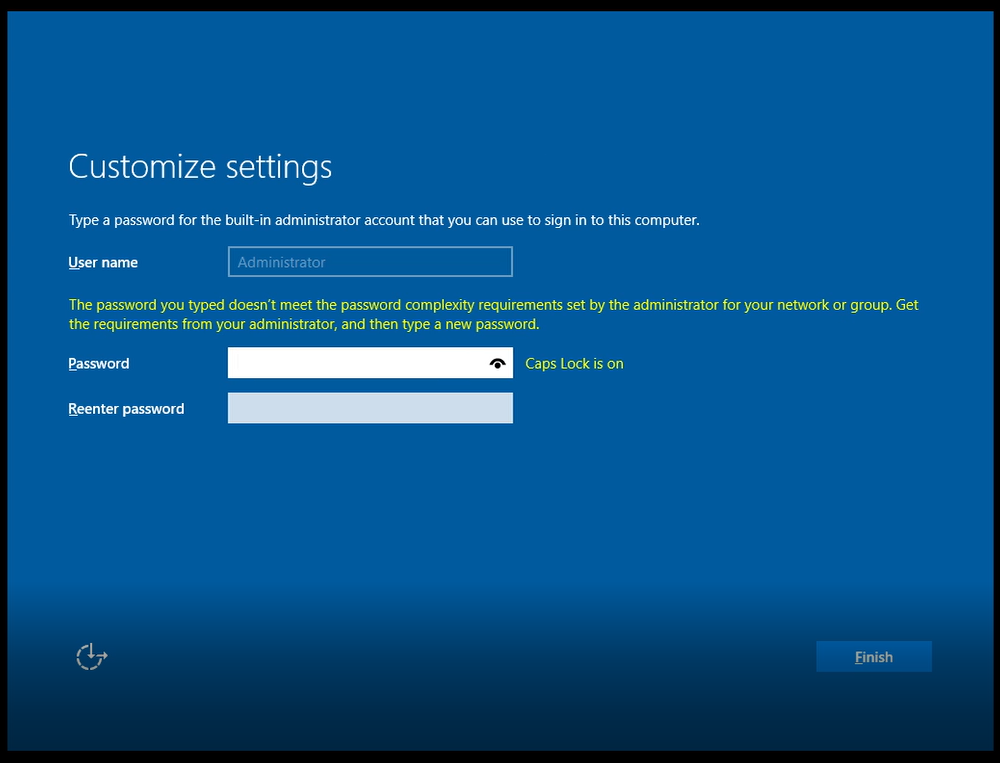
- When next is pressed, Windows should start installing the files which can take around 5-10 minutes (HDD would be slower). Once installed, it will ask you to enter a password (I would recommend one easier to remember) as shown below and then press next.
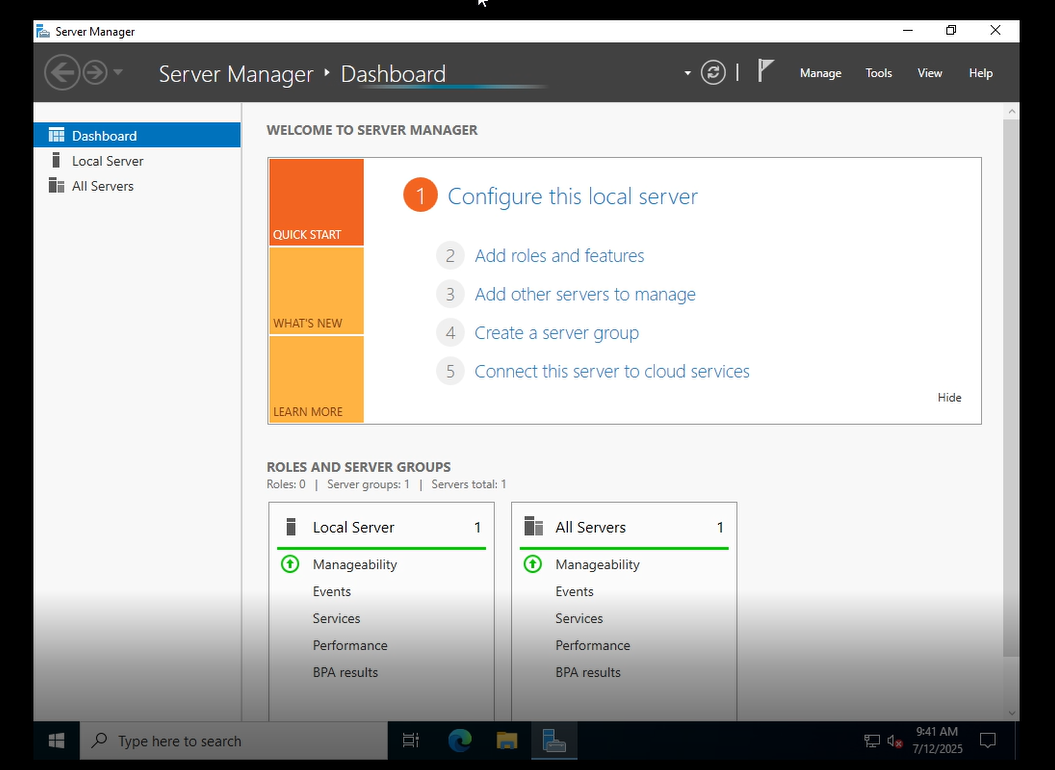
- Windows Server 2022 will complete the final configuration page and you should receive a Window like below which should confirm it is all ready to go. (Don't worry about any errors showing up, we will address those in the next day)
Section 3.4 Video Tutorial
3.5 - Final words
Well, this is the end of this blog. Daunting right? But this is a piece of cake compared to the blogs are coming out soon. But now we have a foundation to build on and a machine we can use to wreak havoc on.
-Shamas