From Lab to Cloud - Decrypting the code: Active Directory users, groups and OUs
Let us take a step back...
Sections
Section 5.1 IntroductionSection 5.2 Active Directory users
Section 5.3 Active Directory groups
Section 5.4 Active Directory OU
Section 5.5 Video Tutorial Section 5.6 Final Words
Section 5.1 Introduction
As the title says, decrypting the code of an interesting service which has it is good, and it has it is bad. After the last blog, would not be surprised if you are thinking of giving up right? But do not worry, that is why my blog is the best in the business (well the best for you because that is why you are still reading this).
Let us begin this blog and trust my word when I say that AD is used in many tech companies in the world. Learning the concepts of Active Directory will help you when finding jobs in the technical (non-coding) industry.
Section 5.2 Active Directory users
The first part of decryption, finding out about Active Directory Users. How about we take a step back.
what are users? Users are you, the people reading this, me the person creating this blog.
We are all users, using a service to create and read this blog. That is the simple definition of what a user is so how is this relevant? Well in Active Directory, there is a cool feature where we can create User accounts.
I know what you are thinking "What are user accounts? Are they like email or Spotify accounts?"
They kind of are but time to decrypt this and make the definition the simplest I can. In Active Directory, we can create an entity called users which represents either me, you or another person. It is the Active Directory way of identifying the people that are part of this directory service. Like the last blog, these users are part of a collection that make up Active Directory as it is. These users are separated into the phenomenon "user accounts".
"How do they work?"
Valid question to be honest. But I am not your standard CS teacher needing caffeine to survive and I have some sanity in me so I will break this down properly below...
User accounts and how they work.
For this, we shall take a blast into the past. When we were in University or School, we always had login details when accessing their Lab PC's (to be honest, I just played games on them half the times). But when the PC booted up, it asked us for login details, and you normally enter your username and password they gave you at the start.
"Simple, right? From the user's side, yes — just enter your password. But in the background, here is what really happens:"
Step 1: User Login Attempt
The authentication process begins when a user enters their username and password at the Windows login screen.
Step 2: Contacting the Domain Controller
Once the credentials are entered, the PC contacts a Domain Controller (DC) on the network. The Domain Controller is responsible for validating the login request against the Active Directory database.
Step 3: Authentication Checks by the Domain Controller
The Domain Controller performs several key checks:
Account Verification
It checks whether the user account exists in the Active Directory database.
Account Status
It verifies that the account is enabled and not locked out or disabled.
Password Validation
The entered password is securely compared to the stored password hash. This is done using hashing and encryption to prevent plaintext password exposure.
Step 4: Successful Authentication
If all checks are successful:
The user is authenticated.
A Kerberos ticket is issued, allowing access to the PC and domain resources.
If Kerberos isn’t available, an NTLM token may be used as a fall-back method.
Step 5: Failed Authentication
If any of the checks fail, the user is denied access and receives an appropriate error message, such as:
"Incorrect password"
"Account disabled"
"Account locked out”
Kerberos ticket - Temporary encrypted pass that proves your identity on the network. Kind of like an ID pass but a virtual one
NTLM token - This is an older method and not to worry about, but it is when you sign in once and a token is created, and you do not need to sign in again. Like single sign on
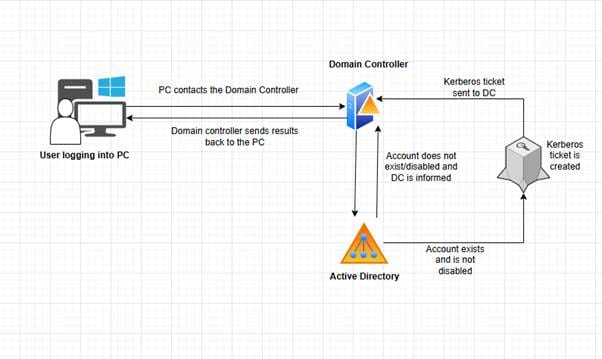
Small Diagram for Visual Interpretation on how this works
Different types of Users
Time for something a bit different. Active Directory has different pre-made users that can be assigned to user accounts. I will go over them quickly below.
Domain Administrators - Highest level of admin as users with this role will have administrator rights
Administrator - Admin rights for the domain and control most operations but not will require Domain Administrator to have access to control external domain connections
Service Account - Accounts used by applications and services to access a specific network resource
User account - Standard user account like the ones we use in our workplace or university
Tutorial - How do we create an AD user - the uncomplicated way.
Now it is time for something a bit more technical. Creating an AD user is a piece of cake and takes about 2 minutes to do (I hope. No warranty or guarantees for this).
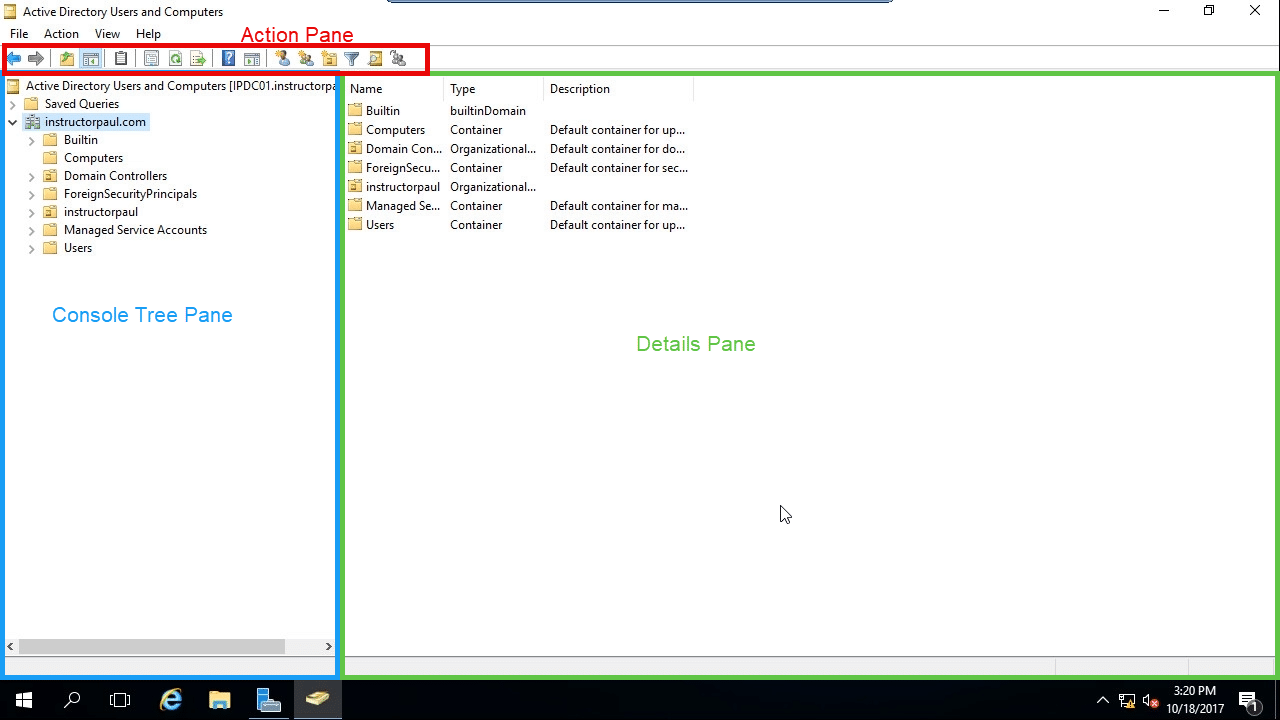
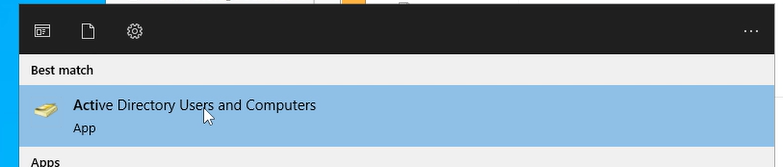
Step 1 - Open Active Directory users and computers application
First, it is time to go to the Domain Controller VM that was created in the last blog. Should be easy right? Now search for Active Directory users and computers application and open this application.
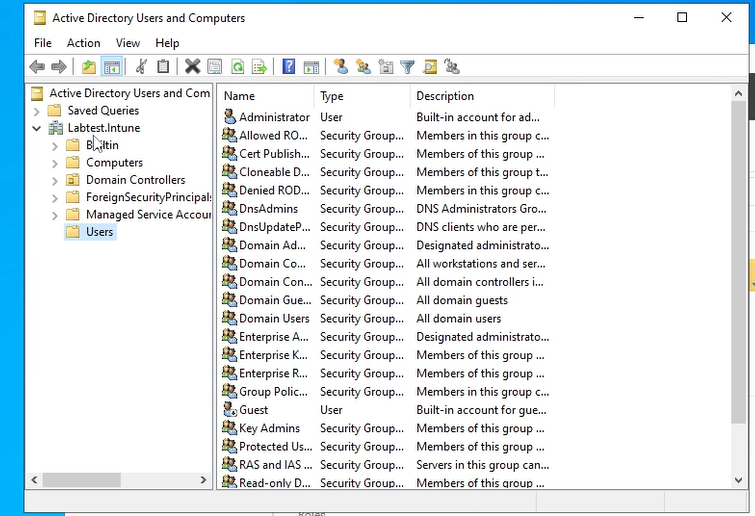
Step 2 - Finding the users folder.
Once the application opens, there will be your domain listed. In my case it is Labtest.Intune. Press the > icon which should show an hidden tab and then you should see a user folder.
Step 3 - Creating a user in AD
Now step 3, let's create the user. Right click the white space and press new. Then press user and fill out the details accordingly and then press next
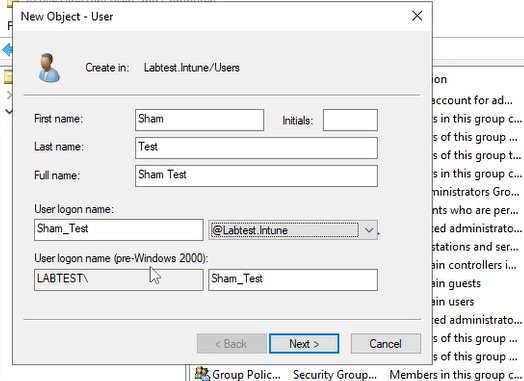
The screenshot shows shows the details needed to fill in
First name - First name to enter
Last name - Last name to enter
Full name - What the full name of the user are
User logon name - identifier used when logging onto the computer or network
Step 4 - Finalizing the user account
Now it's time to finalise the account. Enter a password for the account and leave all the checkboxes unchecked. Press next and review the summary and press finish. Once finished, the account should be created and can be viewed in the users folder.

Now the account has been created and this is how we create an account in Active directory. So simple that even a 10 year old can do this.
Section 5.3 Active Directory groups 👥
That was an easy section, now let's focus on something a bit different with a feature called Active Directory groups (I will try and keep this clear and short I promise)
Active Directory groups why do we have them?
Active Directory groups are something that is critical when organising different functions of your Infrastructure and allow certain people to access certain resources that a standard user will not be able to. To explain this, I will give an example.
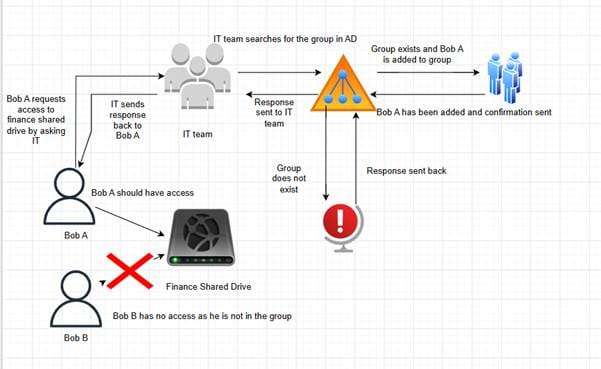
Let’s say we have Bob A and Bob B, who both work at the same company.
Bob A needs access to a shared network drive (e.g. \\fileserver\finance).
The company uses Active Directory (AD) groups to manage access, so there's a group called:Finance-SharedDrive-Access
To give Bob A access:
The IT team adds Bob A to the Finance-SharedDrive-Access group in AD.
The shared drive has permissions set so that only members of this group can access it.
Once Bob A logs in (or refreshes his group membership), he can access the drive.
Bob B, who is not in the group, will get an "Access Denied" error if he tries to open it.
(When they access the shared drive, the domain checks if they have access to that resource by checking the groups the account is in)
Visual diagram for all this (Ignore my wonky lines)
Simple to understand right? However, there is another part I have discovered that needs to be mentioned.
Built-in groups in AD to expect
Ok now time for something a bit more interesting. Active Directory has a few built in groups that you will see when opening the Active Directory User and Computers application. I will list them below to get straight to the point.
Security groups - Groups that are used to control access to resources by assigning permissions to the group and then members of the group, inherit those permissions. This is exactly how the example regarding the finance shared drive works since the finance shared drive will be represented as a security group. If we follow my diagram, Bob A inherits those permissions and can access a resource.
Distribution groups - Group that are used as an email mailing list allowing messages to be sent to all members of the group. For example it_support@labtest.com can send an email to all people in that group
Easy right? it is just a way to send a single email to multiple users in one group.
Group Scopes
One final thing to consider here is group scopes. But I will make this quick. There are three group scopes we need to consider -
Domain local group scope - used to assign permissions to resources within the same domain where the group exists.
An example would be a finance-shared-access group which would be a domain-local-group as that will be on the domain
Global group scope - used to organize users with similar r0les or responsibilities within the same domains and can be used to next into other groups.
An example would be to create a global group called finance users and add all finance users to the group. Then the group can be added to a local group like finance-shared-access
Universal group scope - designed to used in multiple domains in a forest. This will only apply to domains where there is a multi domain setup and is used to group users and assign permissions
An example would be a domain such as Labtest.intune.com and another domain called Lab.test.com and a Universal group is created to assign permissions to resources across domains
Bit of a rabbit hole but these are the base fundamentals
Tutorial - How to create an AD group without making your VM catch on fire.
Time to create an AD group. Here we go as Fabrizio Romano claimed..
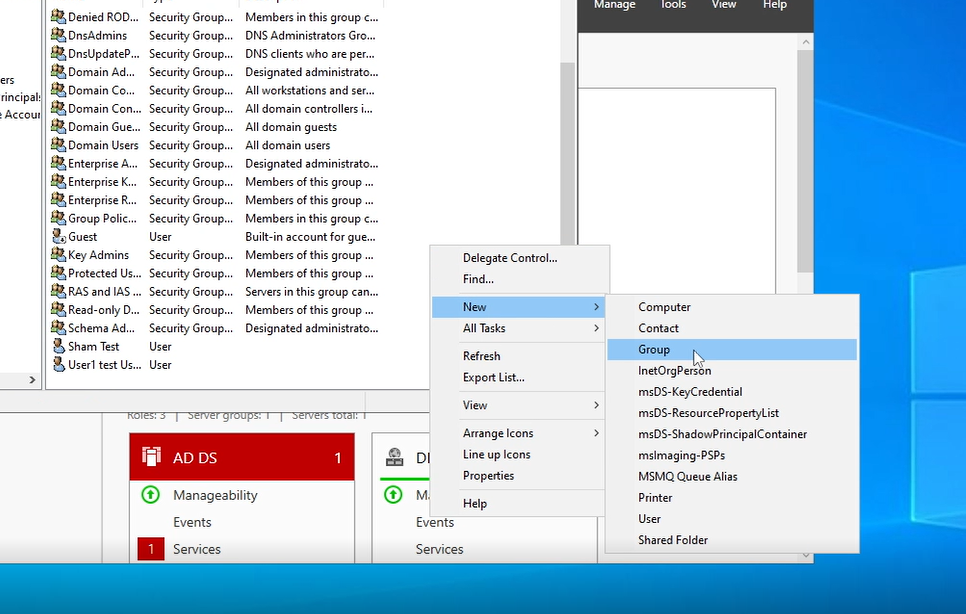
Step 1 - Open Active directory users and computers and start the process of creating a new user
As the title of the step says, we will start the process of creating a new user. You will need to open Active directory users and computers application and navigate to the users folder (same steps when creating a user in AD). Right click the white space, press new and then group.
Step 2- Filling in the group details
The next stage will be entering the groups details. I will attach a screeshot of how the window will look and the details to enter.
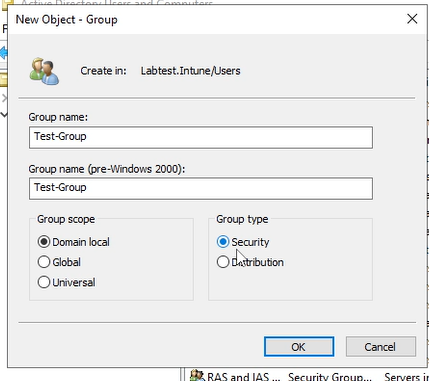
As seen from the screenshot there will be different fields to enter.
Group name: Name of the group.
Group scope - What will the scope of the group be. It will be domain local for this case.
Group type - Security or Distribution. Security will be the purpose of this tutorial as I will create a group that will act as a shared drive.
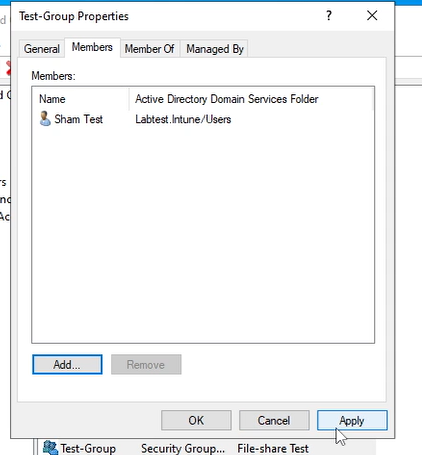
Step 3 - Adding a user to a group
Press ok and the group should be created in the user folder. Now the group has been created, it is time to add a user to one of these groups.
Double click the group and press the members tab and then press the add button. A window should open, enter the account name (in my situation, it will be sham_test) and then press check name. If the account exists, the user will be underlined, press ok and press apply, the account should be added.
Now the user has been added. The tutorial is complete and now you know how to create a group and add the user. Time for the next section, AD Ou's..
Section 5.4 Active Directory OUs 📁
Active Directory OU can mean many things but as you guessed from the header, it is something related to a folder or a collection even. If you are thinking that, then you are on the right track. When I started, I thought OU was some type of codename, but now I am here writing my own blog about these topics. How time flies. Ok time to get to business and tackle this topic.
Explaining what an OU is - in my way...
So, what is an OU, let me break it down. In simple terms an OU stands for Organisational unit and is an object used to organise and manage users, groups, computers and objects within a domain.
Pretty simple definition. It is like a folder that stores all your documents for university with all the content managed by an entity called the Domain Controller. For example, we could create a folder called People which we can store all users in that folder. The People folder will be called the Organisational unit. I will attach a diagram below how this works.
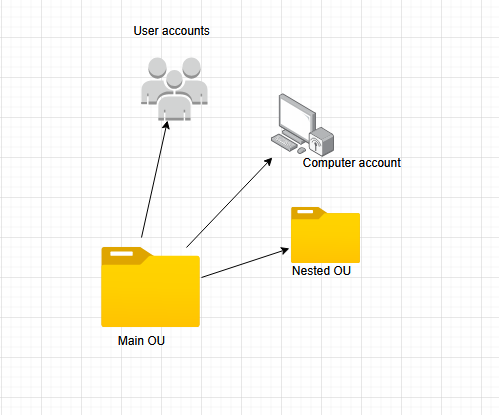
How do OUs work
This is a simple diagram how OU's work. There is a main OU that can contain user accounts, computer accounts and it can also have nested OU's. Nested OUs are folders that are within the main OU. Sounds a bit of a tongue twister but that's Microsoft for you.
Why does AD even use OU's?
That is a question that has all the tech people squirm at our ignorance. However, the answer is pretty easy, and it is based on a concept called Group policy objects or well known as GPOs. GPOs are an amazing feature that allows admins to manage and configure settings for computers and users in an AD environment. Remarkably similar to a device configuration profile in which we will cover in the Intune blog coming soon. But now for the tutorial part.
Tutorial - How to create an OU and Nest an OU in another OU like a certified expert.
Final tutorial of the day, creating an OU the simple way..
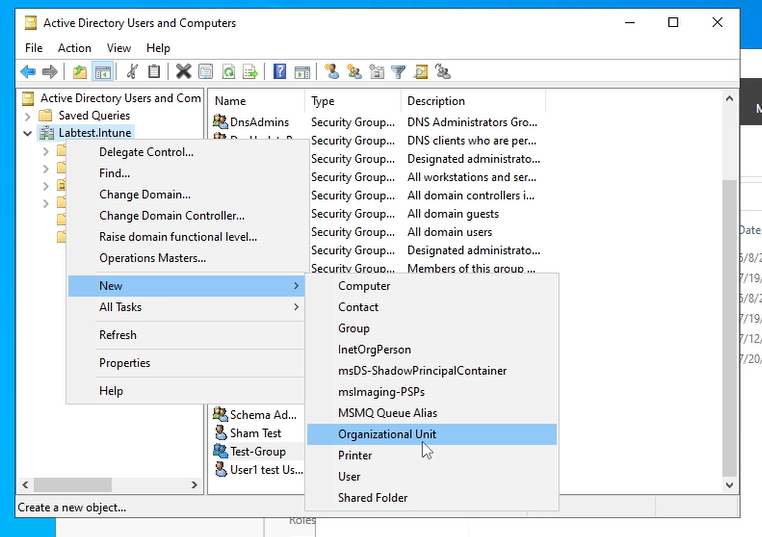
Step 1 - Start the process of creating an OU through the Active directory users and computer application
Go to the active directory users and computer application (I know i mentioned this a lot but this is a key application) and then right click the domain (in my case it will be Labtest.intune). Press new -> Organizational unit.
Step 2 - Inputting the OU details and moving a user to the OU
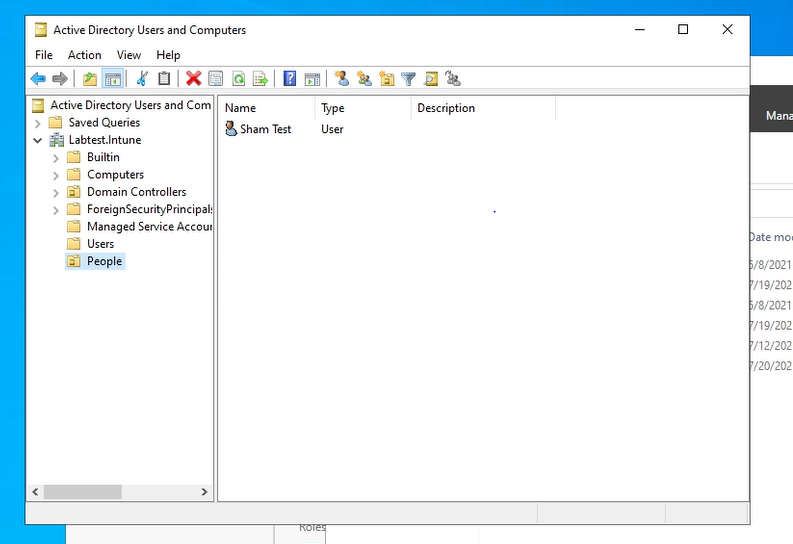
Now it is time to enter the OU details. Give the OU a name and make sure to keep the checkbox "prevent accidental deletion" checked. Once done, go to the users folder and drag the user you created in tutorial 1 to the people folder.
Step 3 - PowerShell script to generate new users (optional)
This is an optional step but I created a PS script that will auto create new users in the People OU. Download the file through the button below and run it on your Domain controller VM.
Section 5.5 Video Tutorial 🎥
Section 5.5 Final words
Final words of the blog. I will keep this short and sweet. As a wise man once said "Be the best version of yourself". Next blog we will shift focus from on-premise and focus more on Azure and the cloud side. Should be light weight.
Signing off
- Shamas