From Lab to Cloud - When Beauty Meets Beast: DHCP, DNS & Active Directory

Now things will become more challenging...
Sections
Section 4.1 IntroductionSection 4.2 DNS,DHCP and AD - What are they
Section 4.3 IP and DNS VM setup
Section 4.4 AD domain Controller setup
Section 4.5 Video Tutorial Section 4.6 Final Words
Section 4.1 Introduction
Well, it’s the start of a new day while a storm brews. As you are reading the title your mind is thinking Who is AD? What’s a DHCP? I was in the similar boat as you when I started my first HomeLab battling these different terminologies.
But now I am here, helping all of you reading this start something special. Start this. Today we talk about AD, DHCP and DNS, fancy words, right? But once I explain everything, it will feel like you're a tech expert at the end of this post. Maybe this is something you can post on LinkedIn on how you set up an AD domain from a virtual machine. Who knows? But now let’s begin.
Section 4.2 DNS,DHCP and AD - What are they?
1 - What is DNS
DNS, What is DNS? ChatGPT puts the definition of DNS as the Phonebook of the Internet. Helpful right? But lets break that acronym down D N S to simple words. DNS translates to domain name service and the main simple function of this is to translate addresses such as www.google.com into IP addresses. I will attach a simple process below
www.google.com entered -> browser checks if you have visited the site before -> if no then IP checks with DNS server to resolve the name -> DNS server responds with IP address -> browser uses the IP address to connect to the site
Simple right. The reason why we need DNS is so our Domain controller can talk to the client PC we will set up in a future blog post. But for now just keep this concept in your head as I do not wish to turn this into a CCNA certification.
2 - What is DHCP
Now let's talk about DHCP. Something that even I was confused on when I started version 1 of my HomeLab. Let me break it down in simple terms DHCP stands for Dynamic Host Configuration Protocol and the simple reason this exists is it automatically assigns IP addresses, subnet masks, default gateways and DNS server addresses to clients that try and connect
This is a key area in our setup since this server will allow us to connect to our client machine, but I will demonstrate how we will set this up in a meticulous way to allow this connection to happen. I know this seems like a lot, but I will add a small definition bank below
Small definitions
Subnet Mask - Identifies which part of an IP address is the host and network
IP address - Unique numerical label that uses an Internet protocol and allows devices to identify and send data to each other
Default Gateway - allows users to access services outside your network. In your case it would be the Router
3 - What is AD (Active Directory)
Active Directory a key part of this section and what we will plan to set up today. What is Active directory, is it a man? is it a bird? Not quite but Active Directory is a service that organise, manage users, computers, network resources and much more. Think of it like a database with different resources that are stored and can be accessed and used within the domain. That's the most simple definition I can think of. There are different variants of Active Directory and I will discuss them below.
Active Directory DS (Domain Services) - Core component and is used to manage users and resources and verifies their identity for computers trying to access the network
Active Directory Certificate Services - Manages Digital certificates
Active Directory Federation Services - Enables SSO (Single sign on allows users to log in once without the need to re-enter credentials)
Now let's get to the more trickier part. The setup...
Section 4.3 IP and DNS VM Virtual Machine Setup
This section is the trickiest part of this blog. I will try and explain this the best I can as we will require a IP address to use for our VM. We will need 3 things in this area 1) IPV4 address 2) DNS Server 3) DHCP Gateway and I will show this below on how to get this
Step 1 - Run ipconfig /all on your Host Machine
Open Command Prompt as administrator by searching for CMD in the bottom left search bar and right click and run as administrator. Type in ipconfig/all in the CMD box and you should be met with lots of lines of text.
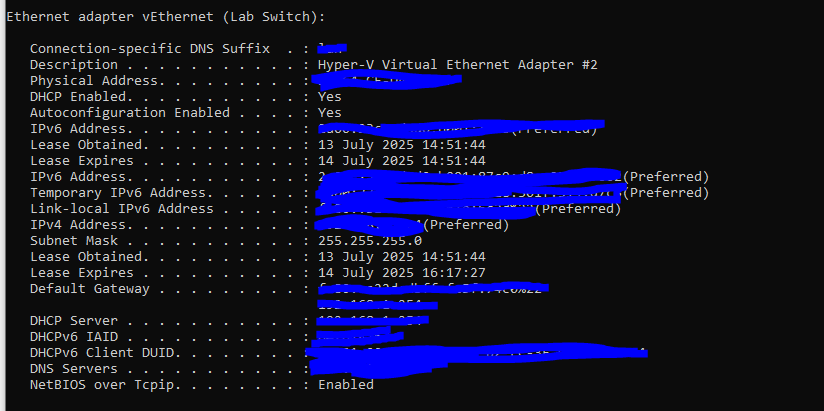
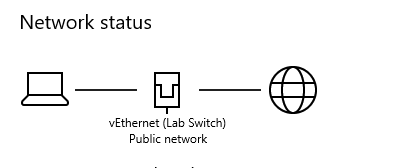
As shown above, you will need to find the adapter your Host PC is using. It will most likely be an Intel AX or Ethernet Adapter (If you do not know this, search for network status and it will show which adapter you are using as shown below).
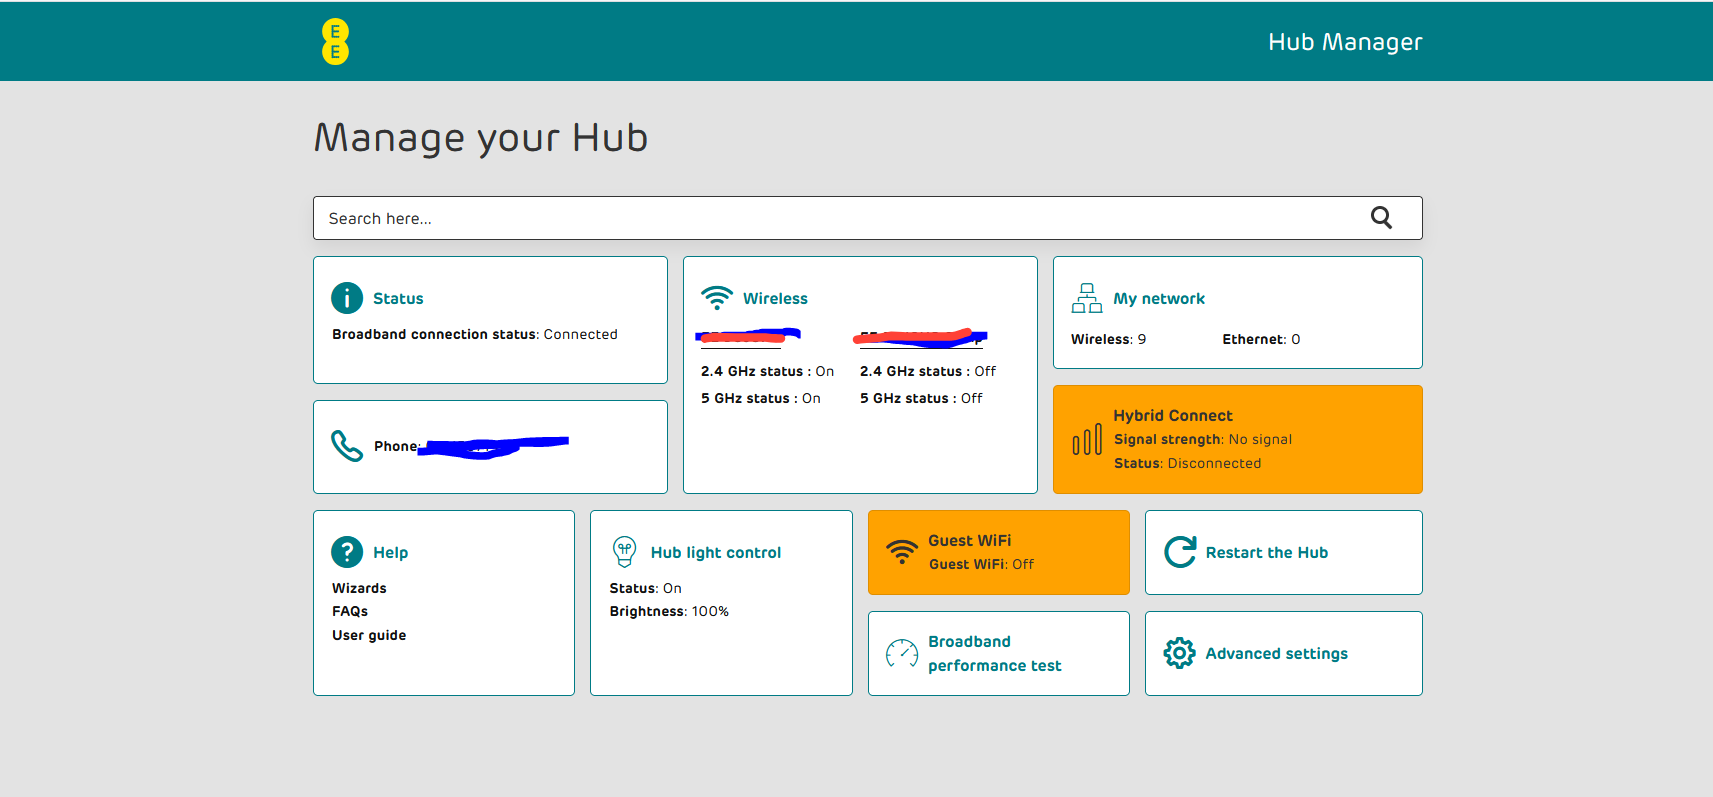
Step 2 - Accessing your Hub Admin page
As Step 2 states, DNS server. Once you have done ipconfig/all and found the adapter your device is using, find the part that says DNS servers in the CMD window. Copy that address and paste it to your web browser of your choice. You should see your Wifi Admin page pop up. It will ask you for an Admin password, you can find this on the back of your router or next to your Wifi Password on your router
Step 3 - Finding the DHCP Server Address Range
This is the most critical part of this area. If you have a search bar in your Hub admin page, find something called DHCP and open this. This should bring up the page below.
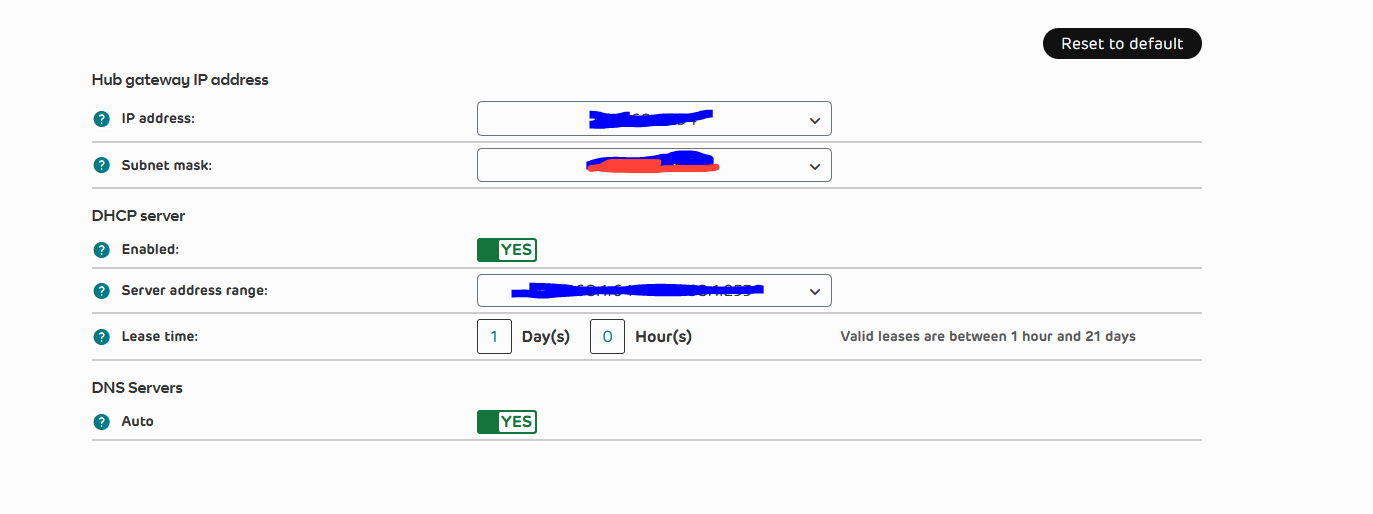
A lot of censoring, I know but you can't be too safe these days. The key section to look at is Server address range. This will give a range of IP's to look at for example 192.168.1.12 - 192.168.1.230
Step 4 - What Static IP address to use?
Which one do we use. Let's look at the example server address range 192.168.1.12 - 192.168.1.230. We will need an IP address outside that range and in this example we will use 192.168.1.10 which is outside the range of the example and will be our IP address for the VM. (If you do get stuck, websites such as Virgin, BT and Sky have information guides on how to find this)
Step 5 - Inputting this information
Now we need to boot up our DC Virtual machine. Once booted up, search for control panel -> Network and Internet -> Network and Sharing Center -> Press ethernet -> A box should show up, press properties
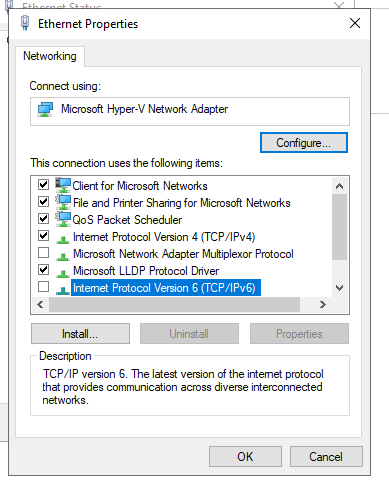
The box above will show up. Make sure to uncheck Internet Protocol Version 6 as there has been times when it has caused issues with Azure AD connect which we will use. Uncheck that box and go to Internet Protocol version 4.
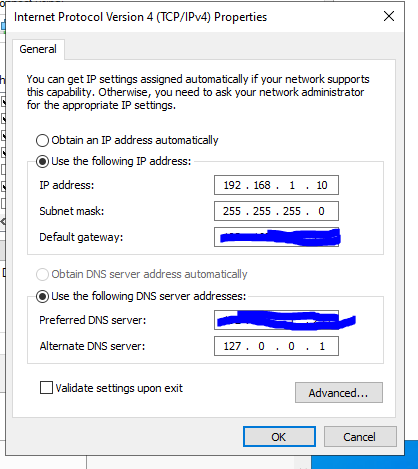
We will need to put in specific details for this
IP address - 192.168.1.10 - Fr0m the example (do not use this in your main setup choose another IP outside the range)
Subnet Mask - 255.255.255.0
Default Gateway - Same as your Host PC (can be found in ipconfig /all)
Preferred DNS Server - Same as your Host PC
Alternate DNS Server - 127.0.0.1 which is a loopback DNS server in case anything goes wrong
Press Ok and proceed to Step 6. That was a lot of information right? Do not worry if you lose Internet connection, we will sort that out in Section 4.4
Step 5.2 - Alternative Method
If you are struggling to find your IP address, you can always use 127.0.0.1 as your preferred DNS server or you can use your host pc DNS server as your preferred DNS server (whatever is your liking but I would recommend your host PC DNS server)
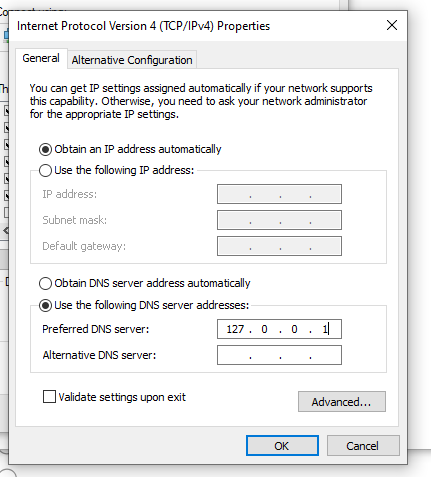
This is an example of how this would look with 127.0.0.1 as the preferred DNS server and the IP will be set to obtain automatically
NOTE - Only do this method if you are having issues
Step 6 - Renaming your PC
Final step, Rename your PC to a meaningful name to use. On your VM search for view your PC name in the bottom left search bar and the settings page should open. Press the Rename your PC button. Choose a name like DC-Lab or name it the same as your Host VM.
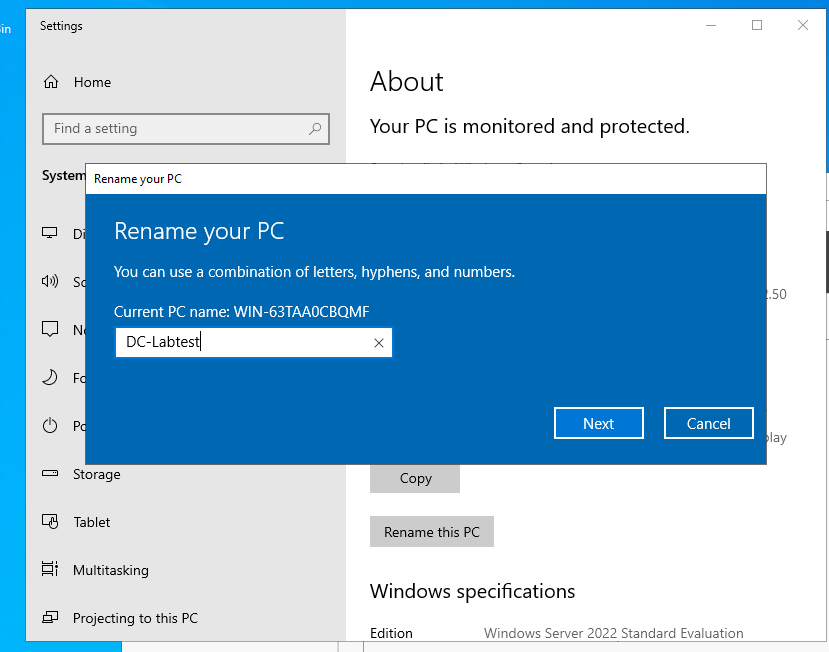
Press Next and then reboot. You should be good to go for Section 4.4.
NOTE - If by any chance you are having issues
Leave IP to Obtain IP address automatically and make sure the Preferred DNS server is your Host PC DNS server (You can make 127.0.0.1 your preferred DNS server if you are struggling to find yours) as shown in step 5.2
Section 4.4 Active Directory Domain Controller Setup
Now the beast of them all. Active Directory Domain Controller Setup awaits us on the horizon.
Step 1 - Installing from Windows Server Manager
Lets get right into this folks! Open Windows Server manager which should automatically open in your VM with a toolbox icon. In the top right press manage and press Add roles and features.
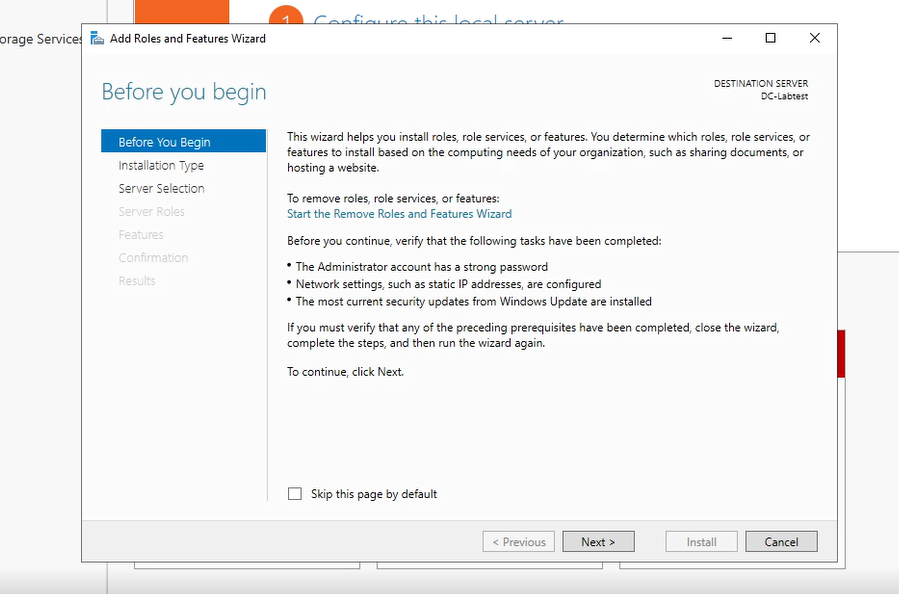
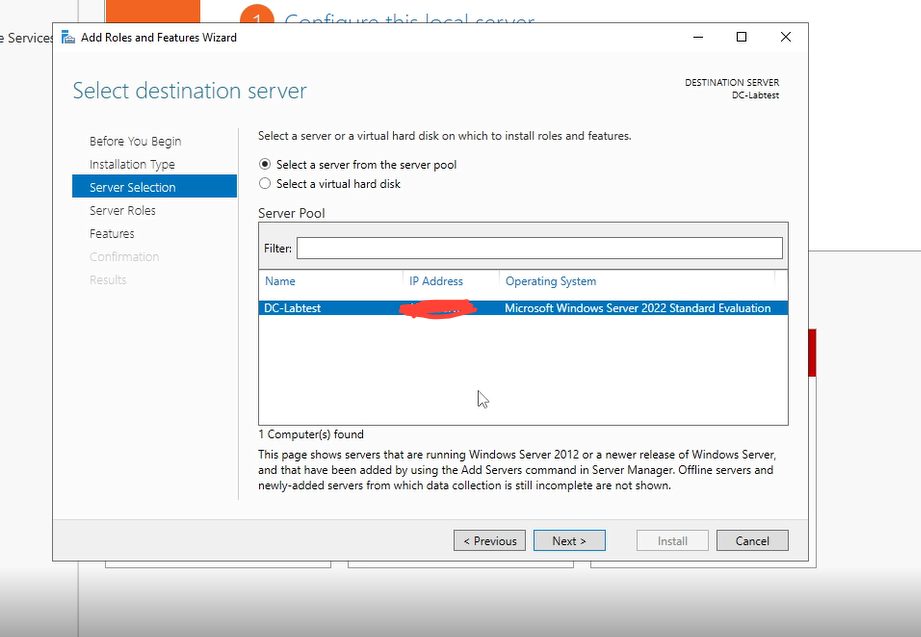
Press next and choose Role based or Feature Installation. Press next and you should see your server in the list. Press Next and make sure your server shows an IP address.
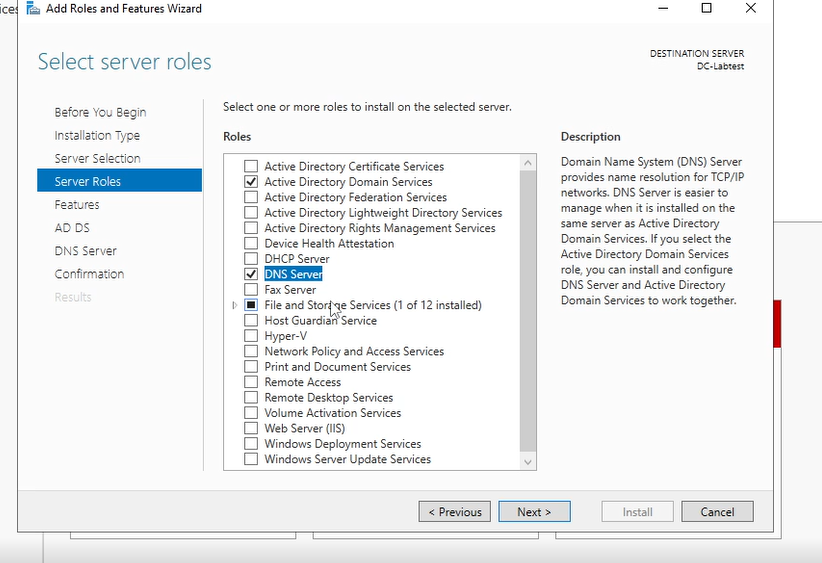
Press Next and you will be greeted with different checkboxes. But all you need to check is Active Directory Domain Services and DNS server. Then press next. (Small popups will show up to confirm your choice. Press Add Features)
Once the options have been checked. Choose next and then the features options should show. Ignore the features options and press next. A Window will show up about AD DS, ignore this for now and press next.
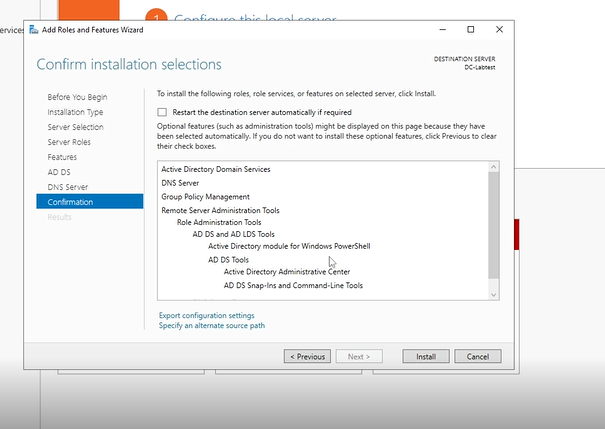
The confirm installation window will pop up and make sure the Restart the destination server automatically if required box is unchecked. Press install and this can take 2-4 minutes to install. Once done, restart your VM and proceed to the next stage.
Step 2 - Promoting the server as the Domain Controller
Now step 2, actually promoting this VM as the domain controller. Should be easy right?
First things first, go to your windows server manager and you should see a flag in the top right with a warning sign. Do not worry, it's nothing to be alarmed about. Press the flag and as you can see there is an option to promote this server as a domain controller. Press this and a window should pop up
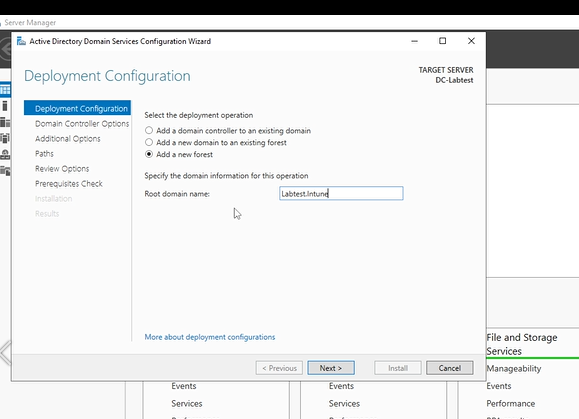
A Deployment configuration window should pop up and as you can see there are different options. Press add a new forest, then enter your root domain name which is what your domain will be called. You can use any name such Labtest or Techwithreps123 etc. I have used Labtest.Intune to make it easier to identify. Click next and the Domain controller option will show up
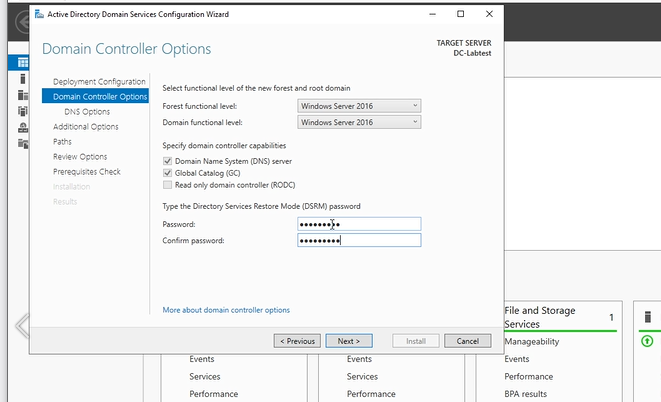
Now the domain controller options. This part is nothing to worry about, leave the forest functional and domain level functional as it is and leave the boxes checked for DNS server and Global catalog. However, you do need to put a Directory restore mode password. Enter a Directory restore mode password and press next.
Directory Services Restore Mode - Allows administrators to perform recovery and maintence on the Active Directory domain system
After this page, a NetBIOS d0main window should show up. Leave this how it is and press next. (Note - NetBIOS domain is a old naming system and is nothing to worry about). After pressing next, some paths will show up and I will explain their functions below.
Database folder - stores the database for the Active Directory Domain (C:\Windows\NTDS)
Logs folder - stores any logs such as creating users etc. Helpful when troubleshooting errors (C:\Windows\NTDS)
SYSVOL - stores essential data such as group policies we will create and logon scripts for users to login (C:\WINDOWS\SYSVOL)
As mentioned above, all these paths are stored in their specific folders. Make sure the paths match and press next. Review the options and press next and then the application should begin pre-requsite checking
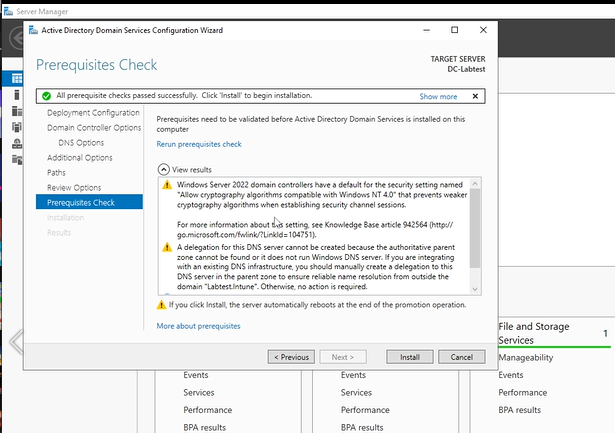
As you can see from the above screenshot, you will see some warnings, but this is perfectly normal. A green check should pop up and press Install. The Domain controller should start installing and can take around 3-4 minutes. Once installed your Virtual Machine will restart.
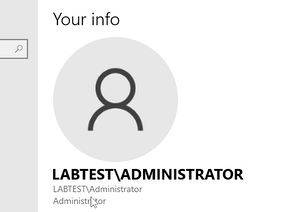
How do we know it installed successfully. Well when you log in, it should have your domain which you set such as Labtest or Ronaldoisthegoat. But the administrator password will be the same password you always used when signing into the Windows Server and we have successfully completed one of the most difficult parts of this post.
Step 3 - DNS forwarding
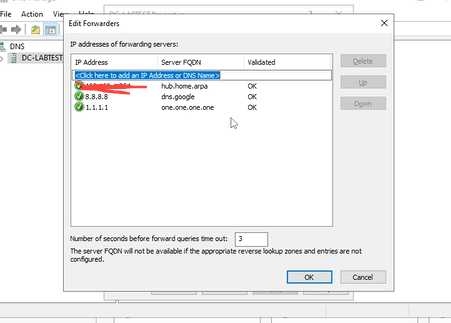
DNS forwarding, the final stage of this beautiful blog. Why do we need this? Well we need this so the client PC which we will join to the domain can access the web. In this step we will be using 2 DNS IP addresses - 8.8.8.8 (Google DNS) 1.1.1.1 (Cloudflare DNS)
To start this. Right click the Windows icon in the bottom left of your DC Virtual machine and press Run. Type in dnsmgmt.msc in the run box and press run.
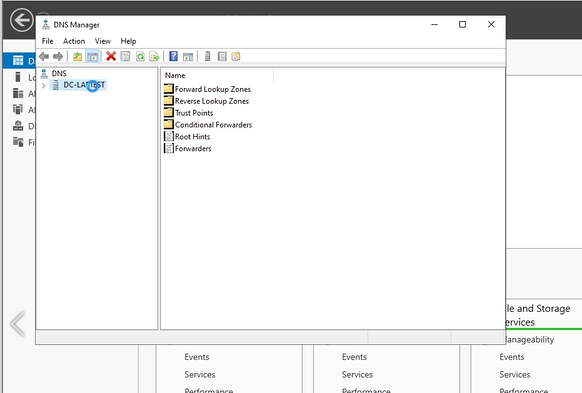
This will open the DNS manager window. Right click your PC name which can be DC-Labtest and press properties. Press the forwarders tab and press edit. After, type in the two IP addresses 8.8.8.8 and 1.1.1.1
Once done, press Ok and then you should be good to go. We are now finished, it was a rollercoaster but I will add a video tutorial for the visual learners below who want to join along.
Section 4.5 Video Tutorial
Section 4.6 Final words
Well that's the end of the blog. It was one of the blogs on the longer side I will create. But you have reached the end congrats! Now I want you to announce to LinkedIn, Reddit or even Discord announcing what you did. Show the world what you created. Also just remember any questions or even issues, just let me know.
-Shamas